Wednesday, May 15, 2013

Weekend sewing

I finally got the O+S Puppet Show outfit finished up.  I changed a couple small things about it that made it easier for me, and next time I know what works and what doesn't, so I'll get it sewn up quicker.


I also found a couple yards of this lovely velour and decided to try and use it up.  I simply forgot how small baby clothes are though, and I barely made a dent in the cut I have after making these two outfits. Both are Kwik Sew 3090 patters, and I can't say enough how much I love this pattern!  It's my go-to when sewing up baby items.  


Sunday, May 12, 2013

Back from the dead...

My sewing mojo is finally coming back.  Though I guess that title could also refer to this blog.  I didn't realize it had been so long since I've sewn or posted on this blog, but it's now been almost 2 years since my last post.

Sure, I've sewn a few things here and there, but really, what fun is it to share a picture of a diaper?  Because really, for the last year, that's *all* I've sewn.  Yep, diapers are cute, and I still love to look at them, but who wants to see a hundred posts of diapers?  And who has time to create a post for each diaper?  Not I!  

However, a few days ago I decided to sew something, gasp, non-diaper related.  I saw my lovely woven stash sitting here aging and collecting dust curing to perfecting and wanted to dig in.  So I pulled out an Oliver + S pattern, Puppet Show, and spent an evening tracing and cutting out my pattern pieces.  


It's a lovely looking pattern, see.


A cute little pair of bloomers, and a lovely little tunic.  The bloomers got sewn up without a snag...


but that's where my sewing bliss ended.  I'm not a novice to sewing and not even a novice to Oliver + S patterns, but this tunic kicked my heinie!  In fact, it's still kicking it, because as you can see from my photos I'm not even finished with it.  


Two full days of sewing, people, and it's still not done.  *sigh*  

It's enough to drive a person crazy.  Part of me wants to just put it in the "get to it later pile", which is really the "never touch it again" pile, but I refuse to give up.  I will conquer!  And hopefully I'll even be back soon to post the finished pictures.


Tuesday, June 21, 2011

A new V-neck tutorial


A little over 2 years ago now, I made and posted a tutorial for a V-neck shirt. It seems to have helped out a few people, so I thought I'd post another one. (Here is a link to the original, if you're interested)


  • Cut your neckband piece to needed length and width (for this shirt I cut mine at 2" wide and 28" long). Place raw ends right side together, and measure 1/2" up from the center and mark it with a dot. Then mark from that dot to each corner like this..


  • Sew basting stitches along the dotted lines, and trim off excess fabric.


  • Turn neck band right side out, and iron with raw edges together (ironing it in place will help prevent shifting, and ensure that you don't end up missing a layer of fabric while sewing it together). Sorry, I didn't get a picture of that part, but I'm sure you know an iron looks like. ;)
  • Place the neckband at the center front of the shirt. This is what makes a v-neck the trickiest, because you have to match up opposing angles. ****BEFORE DOING THIS, MAKE SURE THAT YOU HAVE THE SHOULDER SEAMS OF THE SHIRT SEWN UP***


  • But, with pins, it's not too hard. So pin the center in place.


  • Then manipulate it and place 2-3 more pins on each side of the center pin.

  • Sewing carefully, so as not to hit a pin, baste this center area to the front of the shirt. You've now completed the most arduous part of the v-neck shirt.


  • Finish sewing on the neck band (I like to serge mine, but you can use a sewing machine if that's what you have available).


  • You're done!! Well, with the neck band at least. You might want to add sleeves and sew up the side seams. ;)


I hope this helps you, but if anything is unclear, please don't hesitate to leave a comment with questions.

Wednesday, June 15, 2011

Diapers, wipes and bibs

Here are a few Very Baby fitted diapers I made. I forgot how much I love sewing up this pattern. The curves on it make it so easy and quick to sew.


I also made up a couple of Happy Snap one-size diapers. I made these as an all-in-two/pocket hybrid. They're made with a PUL outer, hidden bamboo fleece and an inner of bamboo velour, with a snap-in soaker AND a pocket opening for stuffing in extra layers.


Then, I made up this fitted diaper. I really like the curves of the Very Baby pattern, but what I don't like is the sizing. It tends to run pretty small, so each size is outgrown very quickly. I have the Darling Diaper Unlimited (DDU) pattern, and the sizing is much better, but I didn't like the front and wing curves. So I just merged the two patterns together, and I now have a better sized diaper with curves that are extremely easy to sew.


I also made a few bibs. I ordered a couple of bibs from a WAHM and I love them, but they'd get very expensive very quickly if you wanted a stash of them. So I used the ones I ordered as inspiration for making a few more for my own stash.


Lastly, I used up a few scraps to make some wipes/washcloths. They're 8"x8", and while I intended them to be the start of a wipes stash, they've very quickly been snatched up for washcloths. :)

Monday, June 13, 2011

DONE!!

Here we go, a clean sewing room (just ignore the sandals in the middle of the floor). Time got away from me though, and I didn't get to snap a few pictures of recent sewing projects, so those will come tomorrow. :)


Accountability

Here's my cleaning accountability post. My sewing room has been a *disaster* for a couple weeks now, and my goal today is to have another post by the end of the day with updated pictures of a CLEAN sewing room. And while I'm at it, I'll take and post some pictures of recent sewing projects...which all happen to be cloth diapers. :)

Messy room pictures...

Friday, May 13, 2011

Bubble dress take 2....& 3

Here're 2 more Oliver + S Bubble Dresses. I really love this pattern. Goes together fairly quickly, and the finished product is so cute!

Monday, May 9, 2011

Diaper, diaper, wherefore art thou diaper?

We've been heard a time or two....or two thousand, quoting Romeo and Juliet in our house lately. Not that it really has anything to do with this post, only that it might help explain the silly title. ;)

I've been sewing up quite a bit lately, but as is my typical fashion, I rarely get around to taking or posting pictures. Since I have a bit of free time today though, I figured I should get caught up.

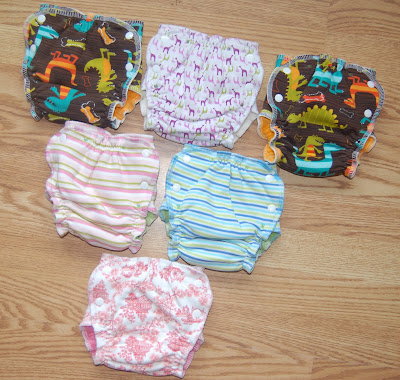
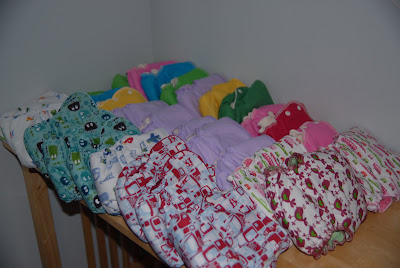
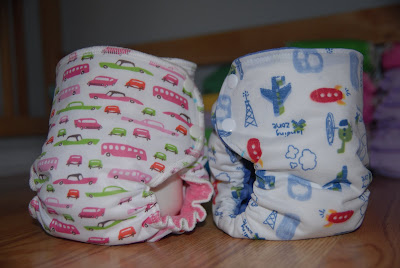
Up first are some diapers that I made last week. We were working on an adoption of a little girl, but that feel through a few days ago. Instead of spending the day feeling sad, and decided to spend the day working on my boy diaper stash. Now we're on our way to being a little more prepared for either, or perhaps even both, a boy or a girl.


All but 3 of these dipes are from the Darling Diapers Unlimited (DDU) pattern, the other 3 are from a Very Baby pattern. Some of them are just serged, and some are turned and topstitched. I prefer the look of the turned and topstitched ones, but I much prefer the speed of making the serged ones. lol

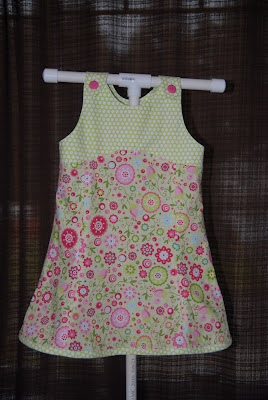
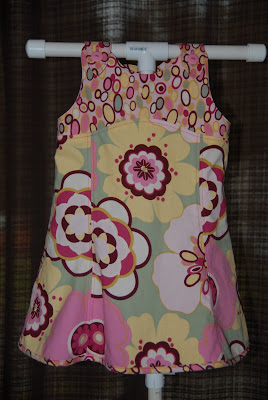
Next up, a couple Oliver + S Tea Party dresses. I actually made these about 2 months ago, but I never posted them, so here they are.


Here is my very favorite dress; the Oliver + S Bubble dress. I love, LOVE, *LOVE* this dress. It didn't, however, love me. Or perhaps my tired mind just didn't want to comprehend what I was doing wrong. I took me about 5 times to get the bodice and skirt sewn together properly. I finally had it right, topstitched it....only to realize that I did not, in fact, have it right. So out came all the topstitching, serger stitching, and the sewing machine stitching...again. I did finally get it right though....only to want to throw it in the trash when it came to the bottom button hole. Grr..... My button holer was working perfectly on the scratch fabric, like it always happens, and it even did the top 2 button holes perfectly, but for some reason, it was dead set against sewing that last one. I must have ripped out those stitches 6-7 times before I gave up, and just moved the hole up about 1/2". For some reason that worked (I think the edge of the button hole foot was partly on top of the seam allowance). After all of that, I still love both the dress and the pattern. I plan to make a few more very soon.

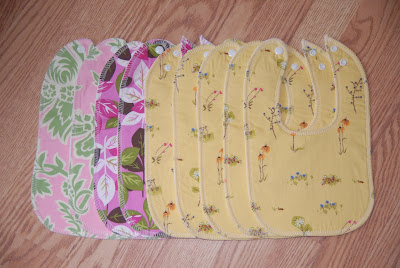
And lastly, a few baby girl outfits. All random Ottobre patterns, except the gown in the very last picture; that's a Kwik Sew pattern.


Wednesday, February 9, 2011

PJs and an AWESOME gift from my dad


Here are 2 pair of PJs that I made recently, and hadn't gotten around to showing yet. First up are the kids Christmas PJs...of which I only have one modeling picture, and they're getting shown a bit late, because....well....they were made a bit late. :p

Each of the kids got the same PJs, with the only difference being the neckbands (there's green, red, orange and blue).

Then we move onto the "cowboy" PJs. I made a pair of these pants for each of the boys, but I'd only managed to make the shirt for this little man. I do have the embroidery done on another shirt, just haven't gotten around to sewing it up yet. *This was my very first embroidery project, and I think it turned out pretty well. I did learn a thing or two about placement (this one is a little bit for in my opinion), and I also decided that I'm going to go ahead and stabilize on the top AND the bottom when embroidering on knits*


And the grand finale....
....
....
....
....
....
....
....
....
....
....
....
....
....
....


.
My dad came to visit me today, and he decided to gift this Cricut Expression (along with all those extras) to me!!! He had it laying around his house thinking he might use it (gotta say, my dad's a sucker for infomercials lol), and when he realized it was just collecting dust, he decided that I should have it! How amazing and generous is that?!?! I've been wanting to try one for a long time now, but I just couldn't ever bring myself to spend the money on it, especially when I didn't know how often I would use it. But now that I have one for FREE, I don't feel guilty about it at all! I've been wanting to get back into stamping and making my own cards, but now I'll be doing that with my Cricut! (Just incase you couldn't tell by all those exclamation marks, I'm totally stocked about this!! lol)

Friday, February 4, 2011

Another try at a difficult pattern

So you may, or may not, remember my post about sewing up a Jetro romper from Otto 4-08. Here's a picture of the original romper I made.

It had a few problems. Some where the way I sewed it, and some were just the result of the pattern itself. The placket was really hard to manage, and binding it was a nightmare. It's no surprise to me that I left that pattern alone and never came back to it....until last night.

You see, last night I saw a tutorial for modifying the pattern to be a full front snapping pattern, and I decided to give it another go. This is the result.


I'm very pleased with the outcome, and sewing up this version was much, much easier than the original. I did have a slightly hard time trying to get the snap placement correct at the crotch area, and I'll make sure to space it out a little better next time, but other than that, it was great improvement on a pattern that I thought I'd never touch again.